
You found an index at FamilySearch with your ancestor but when you click, you realize that all you can see is the image information -- the briefest of transcriptions -- and a citation. You notice a microfilm number in the citation, so you click on "Catalog" and type the film number into the search box for "Film/Fiche Number." In the results you may see an image similar to the one below. Or your image may have many more films available.

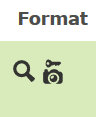 On the right of the page (in the image above and to your right in this post) you notice that there is a magnifying glass and a camera with a key above it. The magnifying glass tells you that the film has been digitized, indexed, and is searchable. You can search from home or anywhere else with internet connection and, hopefully, find your ancestor. But you will not be able to view images except at the Family History Library in Salt Lake City or at a local Family History Center.
 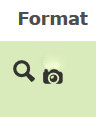 When you search for your film at the Family History Center you will see an image that looks similar to the one at right with magnifying glass and camera but no key. Now you will be able see images that correspond to the indexed information. But please know that you cannot search for your ancestor and then click through to see the image. If you click your ancestor's name after a search, you will see the same thing you saw at home: a transcript with minimal information. The camera indicates that the images are available to you in a format somewhat similar to a microfilm. If the record is a register of births in book form, you will see the pages of the book. You'll have to read the pages and search for your ancestor's name.
To Know and Do Before You Go to the Family History Center
- Register for a FamilySearch account if you haven't already.
- Search for your ancestors while at home.
- Print or somehow save the results of your searches including microfilm numbers, locations, and dates. I'm a paper person so I print the transcription, (and from now on I will circle the microfilm roll number, and use the bottom of the page for additional information and notes.
- Highlight/make note of the microfilm numbers you want to look at while at the Family History Center (FHC). If you've decided to make a list of microfilm numbers be sure to include the names, locations, and dates of your person of interest.
- Notice that some microfilm rolls are subdivided into categories such as Item 1, Items 2-3, etc. You won't know that until you dive a little deeper in the search area.
- Take a flash drive if you want to save images. You'll also be able to print images if that's your preference.
- Know that there may not be much "personal" space at a FHC. Condense and be as organized as possible.
- When you are at the Family History Center, sign in at one of the computers, go to FamilySearch, click "Catalog," and type in the film number you want to search.
- Since you already saved information about your person(s) of interest, dates, location, and film number and item, click on the camera icon for your chosen film and item.
- Now you can search through the images much as you would through a roll of microfilm.
- Be aware that the film number may not appear on all screens as you continue your search and detailed locations don't appear in the citations. Keep clear, accurate, detailed records as you proceed with your searches.
One difference between the online digital images and a roll of microfilm is that FamilySearch has served us well by making a kind of contact sheet where we can see small images of the larger pages. (You can reach that screen by clicking the little icon at left with small rectangles on it.) You'll notice that some images fill the pages; other are smaller and similar to index cards. Those smaller images give information about subsequent pages and may include name of organization and location where the records were made, dates, and possibly microfilm number. This is especially helpful when there are several sets of records on the same roll of microfilm.
If you want to save images of the records you should be able to but you'll have to be more tech savvy than I am. I did not succeed in saving whole pages. In fact, I was unsuccessful in saving the parts of several pages with my persons of interest. I'm sure it can be done but I didn't have time to figure it out while I was there. "Download image" did not work and I couldn't see how to make a screenshot (which would not have been as clear as a download). If any reader knows how to save an image of a document at a Family History Center, I hope you will please share.
Because I didn't know how the system worked at the Family History Center, my time there was not as productive as it could have been. I wasted time using search (at the magnifying glass) and finding no spot to click to see an image. I assumed the microfilm roll images would be available the same way images are at the online FamilySearch website. I wasn't organized as well as I thought, either, especially with knowing exactly which part of a roll of film I wanted to view. And the computer was different than mine at home. I'll be better organized for my next visit.
You can find a local Family History Center or FamilySearch Affiliate Library here by typing in your zip code. I don't know if the Affiliate Libraries offer the same access as the Family History Centers.
Good luck!
--Nancy.
Copyright ©2017 Nancy Messier. All Rights Reserved.
.
Nancy, I had the same problem saving images at my local Family History Center. I took pictures with my cell phone but I couldn't get a clear copy of the entire page so I have 3 pics per page.
ReplyDeleteThanks, Barbara. It's hard having 3 separate images to look at. I've made photos with my phone before but they're not very clear. I think there must be a way to download the images. When I go tomorrow I'll see if one of the volunteers there knows how to do it so we can see the whole page. If I find out I'll report back.
DeleteMost computers have the snipit program that cuts sections of the screen you want to save. I use it all the time to clip documents.
ReplyDeleteHi, Miles. Thanks for mentioning the snipit program. I looked for one or even a way to make a screen shot but couldn't find any. I'm headed back there tomorrow (if it's open) and will ask if I can't figure it out myself. Having the image at home makes all the difference (to me, at least).
DeleteThis page explains how to find and use the Snipping Tool that comes as part of a standard Windows installation:
ReplyDeletehttps://support.microsoft.com/en-us/help/13776/windows-use-snipping-tool-to-capture-screenshots
As it's a free part of the regular installation, I suspect that it's on the FHC computer but possibly not obvious.
I didn't know there was a Snipping Tool until Miles Meyer suggested using it. Yes, I found it on the computers at the FHC. thanks for the link with more information, Marian.
DeleteIn fact, I recommend that everyone practice finding and using the Snipping Tool at home -- maybe weekly -- until it becomes routine for us. It's frustrating to waste precious time at a Family History Center just to find such a useful thing.
ReplyDeleteDon't forget to save the image to your flash drive or email the image to yourself at home.
I found the Snipping Tool easy to use and I love the fact that I can snip a small area of a computer screen instead of making a screenshot and then having to crop after. Thanks for the suggestion to remember to save or email the image, Marian.
Delete